
As this blog grows, I archive all how-to articles here. Have a how-to idea? Have a problem that needs a how-to idea? Reply below!
Starting a Suburban Garden

Backyard Border Garden
First off, start small. The #1 mistake beginning gardeners make is grabbing a garden catalog and deciding they need a vast tract of land so they can grow a row of everything. Arugula! Merveille de Quatre Saisons lettuce! Celtus! Salsify! Twenty-seven varieties of heirloom tomatoes! Did I say, “Start small?” I’ll keep saying it.
Everything in the seed catalog is absolutely the best. Their writers taught Dan Draper the art of persuasion. (Remember, he grew up on a farm, reading this stuff.) Stay strong. Do not give in. Start small. One tomato plant, one bush cucumber or bush squash, and one leafy green of your choice. Seriously, folks, that’s enough for starters. A pepper plant, maybe. The hot ones are easier to grow than the sweets, or at least that’s what I’ve found. Once you’ve successfully grown an 8’ x 4’ space, which is about what the above list of plants would take up, you can make the garden a little bigger next year. Plant what you like to eat: tomatoes, cukes, and lettuce for a salad garden, or tomatoes, hot peppers and cilantro for a salsa garden. Like Southern cooking? Collards and sweet potatoes are both easy to grow and prolific, although the sweet potato vines will want to spread.
Second, buy plants rather than starting seeds, especially for warm-season crops like tomatoes and squash. Some things you have to direct seed: corn, peas, and beans, for example, but buy tomatoes, cukes, peppers, and squash as sets, not seeds.
Third, put your tiny garden in an out-of-the-way spot. I know the conventional image of “vegetable garden” is a square or rectangle occupying the middle of the yard, but that image comes from farms, where they have lots of land and tractors to plow it. Find a nice sunny spot somewhere in the border. Your playing children and cavorting dogs will thank you.
Fourth, soil improvements will pay off ten-fold over increases in garden size. Fortunately, soil improvements are easy, cheap, and readily available in a suburban setting. They are called “grass clippings.” In the Fall, they are called “leaves and grass clippings.”
Labor-saving hint #1: Don’t rake your leaves. Suck them up with the lawn mower. This chops the carbon-containing leaves and mixes them with the nitrogen-containing fresh grass for optimal composting action.
There are a lot of things you can buy at your local hardware palace to add to your soil. Some of them even have “organic” on the label. Other than the stuff that comes out of your grass catcher, you’ll only need two: dolomite limestone (if you don’t have a woodstove or fireplace) and Epsom salts.
Labor saving hint #2: Don’t get the brilliant idea to “wait until all the leaves fall off the trees.” You will curse yourself. The drifts of leaves will clog the mower and you’ll have to lift it up every few feet to clear it, plus you’ll have to empty the bag every twenty feet or so and the carbon/nitrogen ratio will be off. Just mow once a week, more often if you have a sudden leaf drop. Putting whole leaves on the garden or in a compost bin creates an impenetrable layer that can take years to break down. (Yes, I know that this advice is out of season. Just sayin’)
Take the time and effort to dig deeply and break up the soil well. If you have compost, add it. If not, you can add bagged topsoil, compost, or even potting soil. If your soil is heavy clay, consider mixing in some sand. Sprinkle a little Epsom salts and lime or wood ash over your garden plot and mix well.
Labor saving hint #3: choose a pleasant time of day to garden. One of my worst garden experiences was working with people who insisted on waiting until 10am to start. After lunch, it was right back out into the 90°+ heat until about 5 pm, at which time, it having become pleasant outside, we would quit for the day and go into the house. Fortunately, the average suburbanite has something called a “day job” that pretty much demands that you restrict your garden activity to those long summer evenings. Looks like a win-win to me.
Fifth, grow up! This is not a personal judgment on you. I mean garden vertically wherever you can. A five foot row of pole beans will out-yield a ten-foot row of bush beans, and require less weeding, watering, and bending over. Squash, melon, and cucumber vines will yield just as much on a trellis that occupies three feet of garden as they will sprawling across the vast domain they are programmed to conquer. (Warning, do not try this with watermelons, unless you grow the mini-icebox kind.)
Sixth, just add water. Every day that it doesn’t rain, spend a little time outside and give your garden a spritz. Soak the ground so that it takes about 60 seconds to lose the shiny you get from spraying it with water.
Seventh, get the weeds while they’re small. If you’re militant about this, you won’t find gardening a chore at all. If you let the weeds get big, they will fight back, so when you see a new weed, nail it. Get yourself a Dutch (also called “scuffle”) hoe. You push it back and forth just below the soil surface and it cuts the tender roots off the tiny little weeds. (And your plants, if you’re not paying attention.) After the weeds are cut off, put a thick layer of grass clippings around your plants. That will keep the soil moist and new weeds from sprouting. Show no mercy to your weeds and your plants will reward you with more food than you know what to do with.
Easy to Grow More Advanced Not For Beginners
Beans Peas* Eggplant**
Zucchini Broccoli Cauliflower
Hot peppers Bell Peppers Red Bell Peppers
Collards Lettuce* Celery
Kale Melons** Endive
Swiss chard Onions
Tomatoes Carrots
Summer Squash Radishes*
Garlic Corn
*Prefer cool weather. Try planting them in a spot with some shade.
**Long-season. You may need to protect them with plastic as Fall closes in.
Eighth, and last: Start small.
Containing Compost

We’ve always composted, and continued to do so after our recent move. We continued our conserving ways for several months before a neighbor showed up, glanced at the back yard, and cheerfully informed us that the city has fines for people with unsightly properties. Given that everyone else had been complimenting us on how much better the yard looked since we’d moved in, we pretty quickly narrowed down the object of our neighbor’s concern to the pile of dead leaves and grass clippings concealing the potato peels and egg shells.
On a trip to the local hardware palace for yet more perennials, I noticed a plastic compost bin for sale. “51 gallon capacity,” the sign said. That sounds a lot more impressive than “six point eight cubic feet” which also happens to be true. While it might be enough to hold kitchen waste, that’s nowhere near enough capacity for a lawn’s-worth of grass clippings plus two shade trees worth of leaves. Plus, it looked like Dark Helmet’s hat from Spaceballs. We can do better, I thought.
In a few minutes of wandering the aisles, we located 2” x 4” x 8’ landscape timbers at $3.54 each for the corner posts and 6-foot cedar dog-eared fence planks at $1.17 each that would serve as rot-resistant sides. That, plus a bunch of deck screws and a few metal fence stakes, gave us a two-bin, 3’ x 3’ x 4’ compost heap for $55.05. We used scrap lumber for the boards to hold the front slats in place, and recycled the inner cores from dog poop bag rolls for spacers. Buying a 1” x 6” x 12’ and a foot of aquarium hose to replace the recycled items would bring the cost up to just a little over that of the pint-sized commercial model.
However we get a lot more bang for our buck: 36 cubic-foot capacity in each of the two compartments, to be precise, enough for grass clippings and leaves as well as kitchen waste. That works out to 11 cents per gallon of storage capacity, and, other than the recycled plastic spacers, it uses no petroleum products. Compare that to the $1.14/gallon of Mr. Helmet’s hat. May the Schwartz be with you!
Materials list:
3 – 2” x 4” x 8’ landscape timbers
28 – 6-foot cedar fence planks
9 – ¾” length pieces of plastic or metal tubing, ¼” to ½” diameter
144—2” decking screws, 9 – 3 ½” decking screws
4 – 5’ metal fence stakes
Tools:
Saw, measuring tape, marker, drill, screwdriver, level, sledge hammer
Instructions:
Cut the landscape timbers into 4-foot lengths.
Cut 12 of the cedar planks into 3-foot lengths for the sides of the bins.
The planks may split if you run screws directly into them, so it’s a good idea to pre-drill 2 holes on the end of each plank plus two more 2” from the centers of the 6-foot planks. You can expedite this by stacking the planks and drilling them 4 or 5 at a time. Carefully measure the first plank and put it on top of each carefully stacked pile of planks as a template.
Lay three of the posts on the ground, spaced so that they line up with the holes in the 6-foot planks. Space the planks a finger’s-width apart for better air circulation. Screw the planks to the posts using the 2” decking screws. The top piece will extend above the end of the post. You now have the back of your bin.
Stand the back up in the place you want the finished bin to stand and attach the bottom plank to the end, using one screw. Attach the front post to the plank with one screw. Use the level to insure that the posts are vertical and screw the front and back ends of the plank to the uprights. Attach the remaining planks the same way, again, a fingers-width apart. Repeat this procedure for the opposite wall and the middle wall.
You have a bin! Reinforce the walls by driving a metal fence post on the outside of each side wall and on both sides of the center wall, near the front posts. (Rooftop gardeners might want to place a cinderblock on either side of the front posts for support, instead.)
Front:
Attach a 4’ length of board to the center post at top, middle, and bottom, running the 3 1/2” screws through the spacers. Leave a little play between the spacers and the post, rather than running the risk of splitting them by screwing them on too tightly. They’re just there as guidelines. Do the same with the side posts.
Measure the distance between the spacers, subtract ½”, and cut the front planks to that length. Slide the boards into the slots as needed as your bin fills. Remove them when it’s time to move the compost out.
If you have the space and wish to double your capacity, you’ll need to get 12 more cedar slats and four additional fence stakes. Leave your side and center pieces 6 feet long and reinforce the middle of the side and center walls with the stakes.
-

- We can do better than this.
-
- Lay three of the posts on the ground, spaced so that they line up with the holes in the 6-foot planks. Screw the planks to the posts using the 2” decking screws.
-

- Use the level to insure that the posts are vertical and screw the front and back ends of the plank to the uprights.
-

- Space the planks a finger’s-width apart for better air circulation.
-

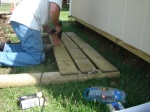
- The spacers go over the screw holding the front board to the front posts. This provides a space to hold the slats that form the front of the bin.
-

- The metal stake keeps the bin sides anchored. This photo also shows how the boards are held onto the front of the bin.
-

- Front boards removed.
<a
Fences, Neighbors
‘Good fences make good neighbors,” the saying goes. I understand that comes from farm life, where someone else’s livestock eating your corn crop or someone playing Finders, Keepers with your cow are Generally Frowned Upon. In the Burbs, although free-running dogs and toddlers can be a problem, it’s more of an esthetic thing. Maintaining boundaries is important. But some people’s idea of their boundaries includes whatever they can see from their windows, whether it’s in their yard or not.
We’re lucky in our current place. It came with a 6-foot cedar fence surrounding most of the yard, and a dense row of Leyland cypress along the other side. We weren’t financially equipped to put a board fence around the remainder, so made do with 4 x4 posts and wire fencing. The lucky part is that the sunny spot, where the shed and garden are, and the someday chicken coop will be, i.e., the industrial part of the yard, is blocked from public view. But what if you’re not so lucky?
Maintain your boundaries, and no one will notice the rest. Most humans, at least those not in direct contact with nature constantly, perceive the natural world as a “Green Screen.” If you keep the edges tidy, the rest will be a blur. So how do you do that?
If your garden has a public face, use an old Amish trick. Plant flowers along the edge facing the viewers. The Amish are fond of petunias. I like a combination of calendulas, dark red marigolds, and blue forget-me-nots. I’ve also used nasturtiums along the edges. Queen Sophia, with its bluish leaves and dark red blossoms is awesome. Keep the edges weeded, even if you fall behind on the rest of the garden. Better yet, keep the whole thing weeded and mulched, but I know how it is sometimes.
If you want privacy and can’t afford a real fence, make your own Green Screen. About the simplest and cheapest is PVC pipe. Make a rectangular frame with t-connectors at the bottom end so you can add two 2-foot long pipes for posts. Max size for stability is 6 feet high and 4 feet wide. If you need to go wider, say 5 or 6 feet, add an extra post in the middle of the bottom horizontal pipe.
Wrap nylon seine twine between the bottom and top horizontal pipes. It’s a good idea to wrap it all the way around each pipe before sending it down (or up) to the other pipe. Pull it snug. (Manly efforts to pull the string so tight the pipe bends are not necessary.) You can put a dot of glue at each wrap to keep it in place. If you want permanence, dig holes a foot and a half deep and put concrete in them. Stick the poles in and brace them until the concrete dries. If you want extra stability, but don’t want it there permanently, ram a couple of 3 foot long pieces of rebar into the ground, leaving a foot or so above ground level. Put the pipe posts over them and ram them at least a foot into the ground.
What size PVC? you may ask. I’d go to the nearest hardware palace, pick up the rebar and take it over to the plumbing supply aisle. Find the pipe that fits the rebar best. Ignore the strange looks from that guy in the overcoat. If you can’t find a pipe that fits snugly, go a size larger and wrap a plastic bag over the rebar before fitting the pipe over it.
Then plant something that grows vines. Annuals like beans, peas, morning glories, moonflowers, or perennials like rambling rose, grapes or hops*, whatever suits your fancy. In a couple of months, your yard will be your Secret Garden.
*hops grow 25 to 30 feet tall. To grow them on a little support like this, you’ll need to train them to zigzag back and forth across it. With hops, you might want to run your twine in horizontal Vs, rather than vertical, and put small notches where the twine wraps, in addition to the glue. For grapes, use horizontal wire supports, notching the sides of the pipe to keep the wires from slipping.

Hi, constantly i used to check website posts here early in
the morning, as i love to find out more and more.
Great blog here! Also your website loads up fast! What host are you using?
Can I get your affiliate link to your host?
I wish my site loaded up as quickly as yours lol
Thanks! I’m with WordPress. v happy with them